
 Using Actions Creatively
June 13, 2008
Photoshop actions are commonly overlooked when creating designs and artwork, often left only for batch editing photographs. However this is about to change, with a bit of imagination you can create very impressive abstract pieces, detailed images which beg for a closer look. Read on to discover how to transform one small image into a large, colorful piece of abstract art.
TUTORIAL FILES
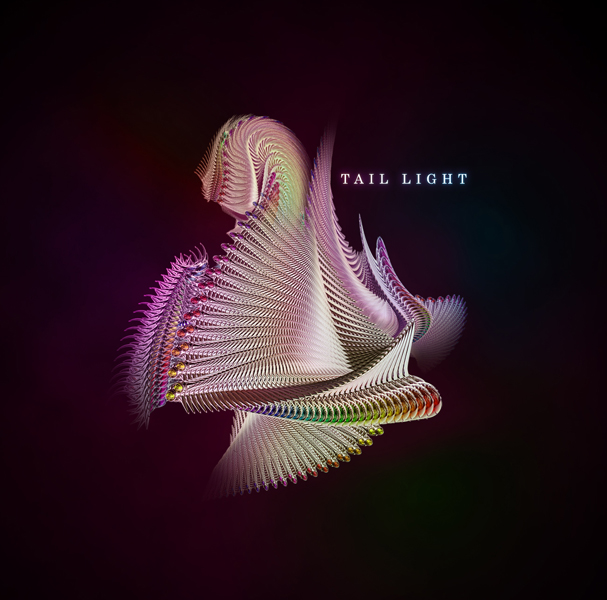
This tutorial will show you how to create an image similar to this:
 STEP 1
STEP 1This tutorial will act more as a guide rather than a step-by-step walkthrough, this is because, although your final image will be similar to the one I created, the results tend to vary due to technique we are using. However this does mean you will get a unique final piece so don’t worry if your images do not match exactly while we go through the steps. Most of the images in the steps show what your image should look like after the step rather than how to complete the step as i figured this would be the most helpful way to illustrate this tutorial.
Begin by selecting an image, images which tend to work well are high contrast with distinctive areas of color, Here is the image I used Tail Light. Create a new document at 1600×2000px and paste the tail light image in. Get rid of the unwanted parts of this photo, I won’t go into detail here as there are more than enough tutorials on this subject, however the pen tool or the polygonal lasso work well. By looking at the image below you can see which parts of this image I opted to keep. Note that I used black as the background color and also adjusted the levels slightly and scaled the image. Lastly duplicate this layer and name the duplicated layer ‘original’ then hide the layer.
 STEP 2
Begin by selecting an image, images which tend to work well are high contrast with distinctive areas of color, Here is the image I used Tail Light. Create a new document at 1600×2000px and paste the tail light image in. Get rid of the unwanted parts of this photo, I won’t go into detail here as there are more than enough tutorials on this subject, however the pen tool or the polygonal lasso work well. By looking at the image below you can see which parts of this image I opted to keep. Note that I used black as the background color and also adjusted the levels slightly and scaled the image. Lastly duplicate this layer and name the duplicated layer ‘original’ then hide the layer.
STEP 2Find the actions panel, we will be using this a lot. With the panel open create a new action, this should immediately start recording any commands you use so it is important you are careful in what buttons you press for example ‘undo’ and ‘redo’ don’t get recorded.
 STEP 3
STEP 3Duplicate the visible image layer then hit ctrl+T to enter free transform mode then scale the image down very slightly, next rotate it clockwise slightly then move it to the left slightly. All of these transforms should be hardly noticeable. We also want to change the colour of the bulbs; go image>adjustments>hue/saturation and change the hue to +10. Use the image shown below as a guide for the transforms.
 STEP 4
STEP 4This is where it all happens, in the actions panel click stop then click on action 1 or whatever you named your action. Now press play… a lot of times, until it looks similar to below. Bin this action as you won’t need it again. Now select all the images except for the one you named ‘original’ and the background obviously, hit ctrl+E to merge them.
 STEP 5
STEP 5This is a good time to create a more interesting background as we have a taste for what the image will look like, This will be a very simple background so in the background layer create a radial gradient going from #3c001c to #000 starting from the middle out to the edges. Create a new layer directly above the background layer, hit D then filter>render>clouds set this layer to 25% opacity and overlay blending mode.
 STEP 6
STEP 6You should have four layers now, the background, the clouds, the hidden original image and the edited image at the top. Select the top layer then create a new action, duplicate the layer and in the layers panel move it down one place. Using the same techniques as in step 3 transform the image then image>adjustments>hue/saturation and change the hue to -15. Try and get it looking like the following image.
 STEP 7
STEP 7Without clicking anything else, stop the action and click on the action title then play the action multiple times until something similar is gained. As before, delete this action then merge all the layers involved with this action leaving you with four layers.
 STEP 8
STEP 8Move this image more into the center of the page then go image>adjustments>color balance and change the values for midtones to +35 -35 -35. Now duplicate the layer and move the duplicated layer behind this layer, scale the duplicated layer down, rotate it then move it to roughly the same place as below.
 STEP 9
STEP 9Remember that layer we named original, move it to the top of the layer stack and unhide it. Now filter>distort>twirl set the value to -250 then scale it down slightly.
 STEP 10
STEP 10Okay, create an action in exactly the same way as before. This time duplicate the layer and move it down one place add a twirl with a value of +5, change the hue to -20 then maybe just move, scale and rotate until it is similar to the image shown below.
 STEP 11
STEP 11It should be easy to work out what to do here; stop, click the action title then play the action a few times then merge the appropriate layers. I also scaled this layer down a small bit.
 STEP 12
STEP 12And again, create a new action. This time I’ll let you work out what I did to make it look like this.
 STEP 13
STEP 13Again, I wont go into much detail here, just remember to merge the appropriate layers
 STEP 14
STEP 14Hit ctrl+T then scale the layer slightly, move it then in the layers panel move it to the back of the other images.
 STEP 15
STEP 15You may have noticed the steps are getting more vague, this is basically because our images probably don’t look the same and because you should know what to do by now. Merge all your layers except the background and the clouds, duplicate this layer, move it down one in the layers stack then filter>distort>twirl with -200 as the value. I then used a combination of the adjustments; color balance and curves to modify the color of this layer. Using a few transforms, try and get a result you are happy with.
 STEP 16
STEP 16Select the eraser tool and set the brush to 200px, 0% hardness, 40% opacity. Use this to erase certain parts of each image layer in order to make them blend into the background more.
 STEP 17
STEP 17Now using the knowledge gained from the steps so far, add a few more elements by using actions, some ideas for using in an action could be a type of blur, lowering the saturation or opacity, maybe even adding some noise. Just experiment for a bit. You will notice I also added some text in the upper right.
 STEP 18
STEP 18Select a radial gradient going from a color of your choice to 0% opacity as shown
 STEP 19
STEP 19Create a new layer then use this gradient to create a blurry ball like so, next change the color on the gradient then create a few more, I used four in total. Lastly change the blend mode of this layer to color then the opacity to what suits your image best.
 CONCLUSION
CONCLUSIONI have only scratched the surface of what can be achieved by using Photoshop actions creatively, for example; brush strokes could be used instead of photographs, as well as a lot more commands being included in each action. The possibilities for this technique are endless. After experimenting for a while, amazing effects can be created very easily. Have fun with it.


6 Ulasan